Problem
There has been lots of buzz about cloud computing lately and looking at the benefits it provides (in terms of cost savings, high availability, scalability (scale up/down) etc.) it is now evident that cloud computing is the future for next generation applications. Many of tomorrow's applications will be designed and hosted in the cloud. Microsoft realizes this potential and provides a cloud computing solution with Windows Azure. Windows Azure platform, which is hosted inside Microsoft data centers, offers several services which you can leverage while developing your application if you target them for the cloud. One of them is Microsoft SQL Azure, it's a cloud based relational database service built on Microsoft SQL Server technologies. In this tip series, I am going to show how you can start creating databases and database objects on the cloud with SQL Azure.
Solution
Recently Microsoft launched Microsoft SQL Azure (formerly called SQL Data Services (SDS)) Oct CTP, which provides relational database capabilities on the cloud and is based on SQL Server technologies. You use familiar T-SQL commands to work with your database though not all T-SQL statements are supported with SQL Azure. You can find a complete list of supported/unsupported T-SQL statements here.
SQL Azures enables you to store structured, semi-structured, and unstructured data in your cloud database. Though the current SQL Azure Oct CTP version offers relational database service only, some of the features are not supported yet, but would likely be part of future CTPs or RTM, (refer to the SQL Azure site on MSDN for the latest updates). In the future it’s going to support more services for example Reporting Services, Analysis Services etc.
Turning the wheel...
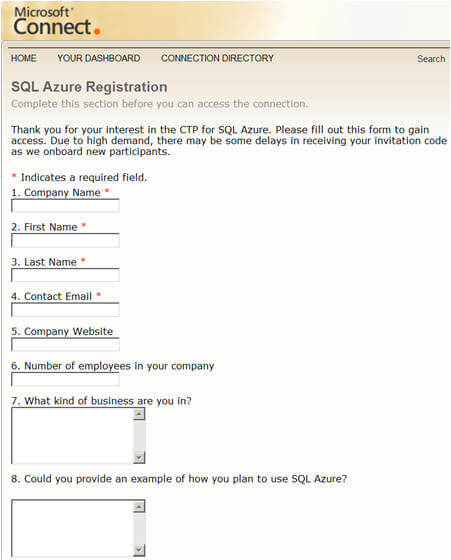
Currently Windows Azure and SQL Azure are in its Community Technology Preview (CTP) version (this example is based on the October CTP). So to work on this, first you need to login with your hotmail or Live ID and you need to register on http://go.microsoft.com/fwlink/?LinkID=149681&clcid=0x09; you will get a form similar to the one shown below.
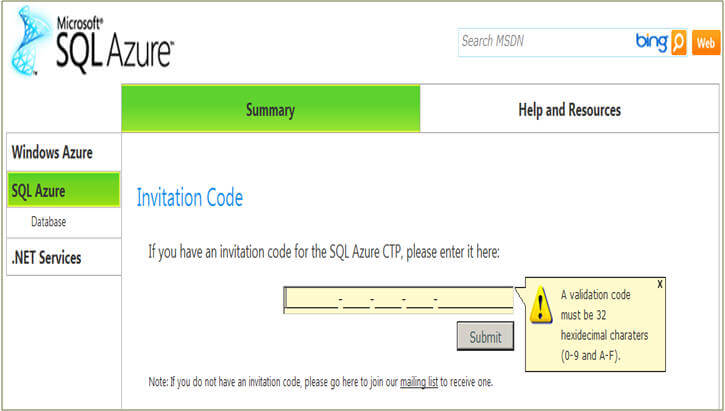
On submitting the above form you will get an email from Microsoft with an invitation code. Then you need to go to https://sql.azure.com/, login with your hotmail or Live ID and enter your invitation code in the form as shown below:
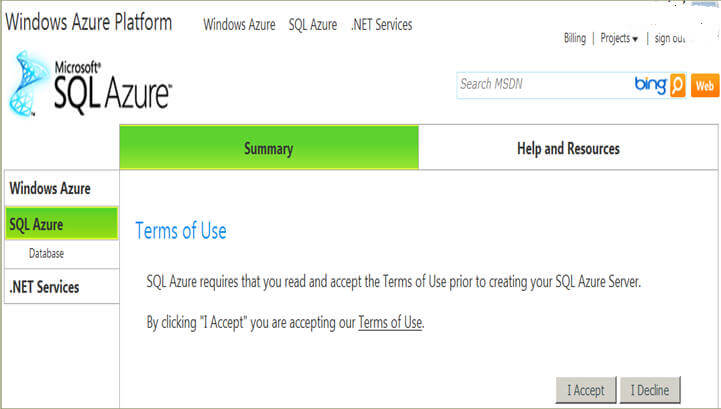
Once you enter correct invitation code, you will be prompted to accept terms of usage, you can accept by clicking on the "I Accept" button after reading it.
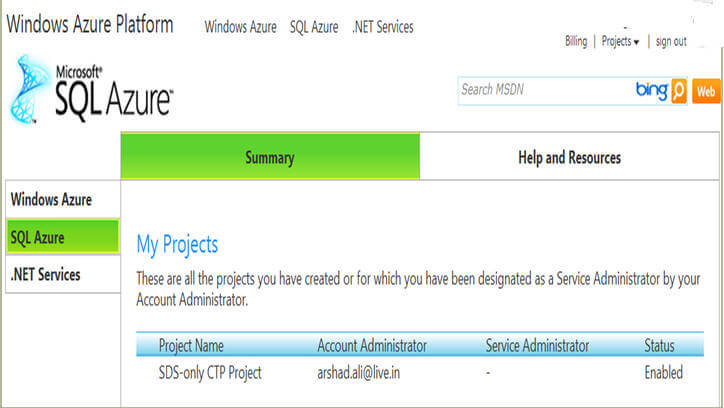
Then you will see the next screen which will show you a default project created for you. You need to click on the Project Name (in current case it is "SDS-Only CTP Project") in the grid to move to the next step..
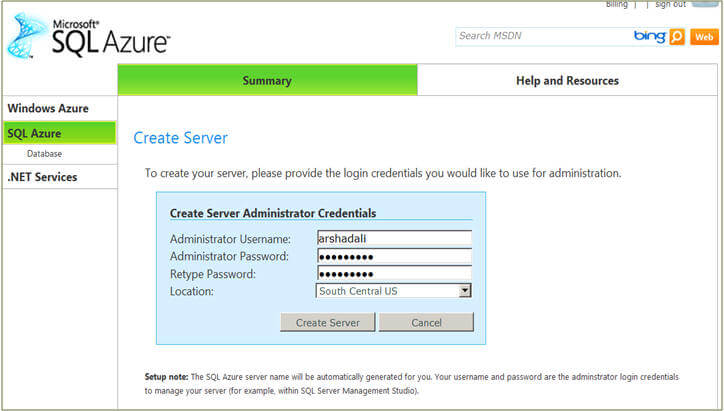
Now that default project is already created, you need to create a server (with Oct CTP you can create one server and five databases in it including the default master database). For that you need to specify the Administrator user name and password. Please keep the Administrator user name and password safe as it will be required when you want to connect to the server from SQL Server Management Studio (SSMS) as an administrator. The server name will be automatically generated and it will be shown to you on the next screen.
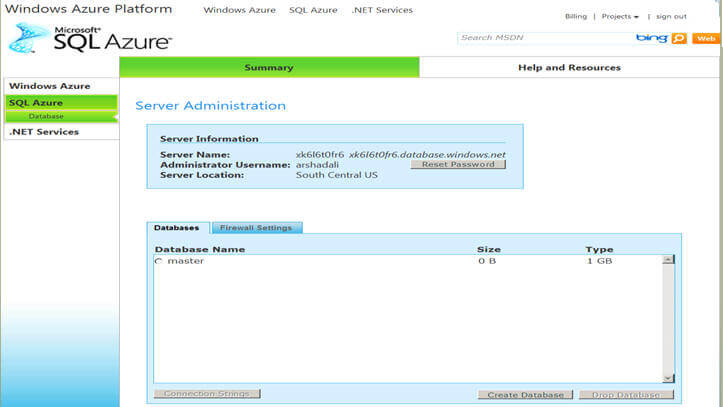
Here you can see a server has been created for you and the user name you specified in last screen is the administrator on the server. By default you will notice a master database is created. On the bottom right you can see there are two options ("Create Database" and "Drop Database"). Click on "Create Database", specify the name of the database and its maximum size.
With the current CTP, two editions of databases can be created, first Web edition which has maximum 1 GB size limit and second Business edition which has maximum 10 GB size limit. More details on these different editions and pricing can be found here.
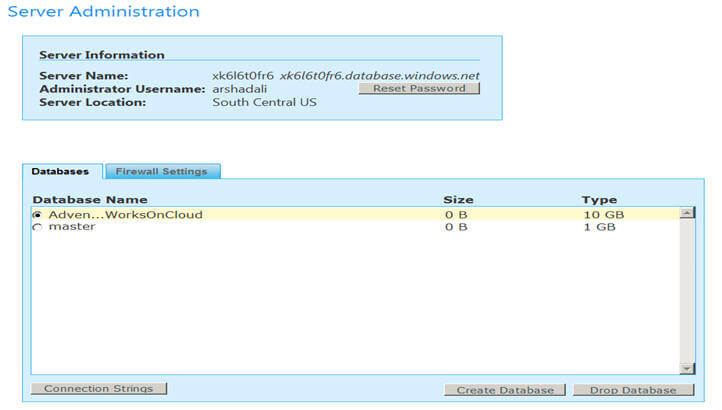
With the "Create Database" option, I created a database called AdventuresWorksOnCloud which you can see here. To get the connection string, which you will need to connect from your applications, you can select the radio button before the database and then click on "Connection Strings" option on the bottom left.
Okay so far we created a server on the cloud and a database in it. Now I am going to show how you can connect to your newly created database.
Launch SSMS by going to Start -> SQL Server 2008 -> SQL Server Management Studio. You will prompted to enter your connection details, click cancel on it because the current CTP does not allow you to connect from SSMS Object Explorer, if you try connecting from there you will get an exception error like this "Invalid object name 'sys.configurations'. (Microsoft SQL Server, Error: 208)". So you need to click the "New Query" button and then specify the server name (which was created above), the user name and password as shown below.
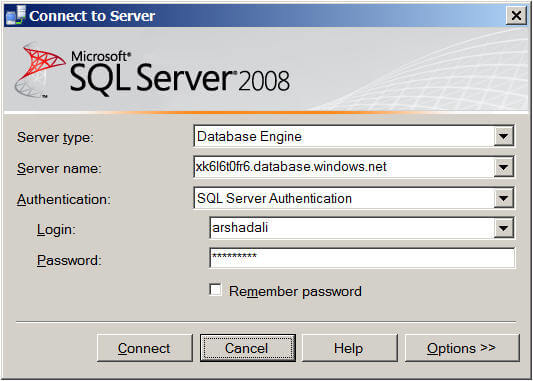
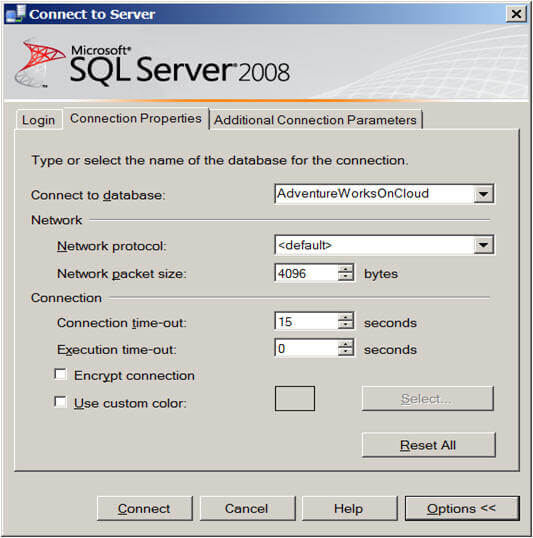
Further as the current CTP does not allow using the USE statement to switch to different database you need to specify which database you want to connect to. For that click on the "Options>>" button and in the "Connect to database" combo-box specify the database name.
Now click on the "Connect" button and you will get an exception error similar to this.
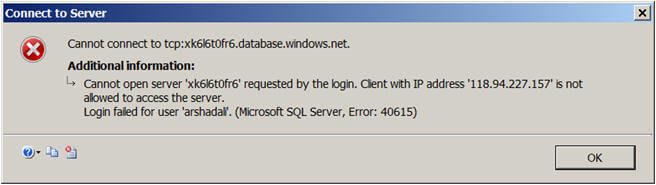
This is because, for security reason, by default all hosts are denied access. So you must specify the IP address ranges of the hosts which will be accessing your server and databases by going to the SQL Azure web portal as shown below:
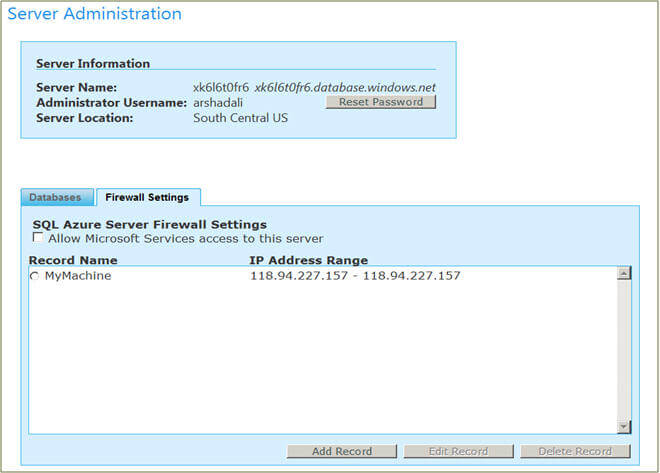
Once the Firewall Settings are set you should be able to connect and use familiar T-SQL commands.
No comments:
Post a Comment