Search

Saturday, June 30, 2012

Query to find oldest active user transaction and kill them

Use below query to find oldest active user transaction and kill them:


DECLARE @sql varchar(8000)
DECLARE @spid VARCHAR(4000)


DECLARE c_trans cursor FAST_FORWARD FOR 
select est.session_id from sys.dm_tran_active_transactions tas 
inner join sys.dm_tran_database_transactions tds on (tas.transaction_id = tds.transaction_id )
inner join sys.dm_tran_session_transactions est on (est.transaction_id=tas.transaction_id)
where est.is_user_transaction =1 and tas.transaction_state =2
and tds.database_transaction_begin_time is not null


OPEN c_trans 
FETCH NEXT FROM c_trans INTO @spid
WHILE @@FETCH_STATUS = 0
BEGIN
SET @SQL = 'kill '+ @spid
EXEC(@SQL)
FETCH NEXT FROM c_trans INTO @spid
END 
CLOSE c_trans
DEALLOCATE c_trans
Friday, June 29, 2012

Backing up and Restoring the database with splitting files to multiple disks

Backing up the database with spiltting files to multiple disks 


BACKUP DATABASE DemoData TO
DISK = 'C:\BACKUPDIR\DemoData_1.BAK',
DISK = 'C:\BACKUPDIR\DemoData_2.BAK',
DISK = 'C:\BACKUPDIR\DemoData_3.BAK'


Feaching logical filenames from one of split backup


RESTORE FILELISTONLY 
FROM DISK = 'C:\BACKUPDIR\DemoData_1.BAK'


Restoring database from multiple spilt files 


RESTORE DATABASE DemoData_COPY FROM
DISK = 'C:\BACKUPDIR\DemoData_1.BAK',
DISK = 'C:\BACKUPDIR\DemoData_2.BAK',
DISK = 'C:\BACKUPDIR\DemoData_3.BAK'
WITH REPLACE ,
MOVE 'DemoData' 
TO 'C:\Program Files\Microsoft SQL Server\MSSQL.1\MSSQL\DATA\DemoData_COPY_DATA.MDF',
MOVE 'DemoData_LOG' 
TO 'C:\Program Files\Microsoft SQL Server\MSSQL.1\MSSQL\DATA\DemoData_COPY_LOG.LDF'

Thursday, June 28, 2012

Script to remove old Database backup

Use below script to remove old database backup:


DECLARE @sql varchar(8000)
DECLARE @BAK_PATH VARCHAR(4000)
declare c_bak cursor FAST_FORWARD FOR 
select bmf.physical_device_name
from msdb..backupset bs 
inner join msdb..backupmediafamily bmf
on (bs.media_set_id=bmf.media_set_id)
where DATEDIFF(DAY,bs.backup_start_date,GETDATE())>30
AND DATEDIFF(DAY,bs.backup_start_date,GETDATE())<=60
OPEN c_bak 
FETCH NEXT FROM c_bak INTO @BAK_PATH 
WHILE @@FETCH_STATUS = 0
BEGIN
SET @SQL = 'EXEC XP_CMDSHELL '+ ''' DEL '+'"'+@BAK_PATH +'"'+''''+', no_output '
PRINT (@SQL)
EXEC(@SQL)
FETCH NEXT FROM c_bak INTO @BAK_PATH 
END 
CLOSE C_BAK
DEALLOCATE C_BAK

Wednesday, June 27, 2012

How to create Custom Reports for SQL Server Management Studio

In this article I will describe in details (including some examples) how you can build your own SQL Server Management Studio reports that are loaded from Object Explorer. The reports can easily be used on SQL Server 2005, 2008 and 2008R2 environments.
1. Requirements
Firs of all let me start with the basic requirements of the environment you need setup so you can produce such reports. Do not get too scared, it is not that big list.  It is actually just one simple application called BIDS (ha ha, yes, this is Microsoft’s Business Intelligence Development Studio, included in SQL Server installation media). But not just any BIDS, but 2005. SSMS have never been upgraded to use the 2008 report viewer component, so the only way your report to be loaded is if it is written on BIDS 2005. For further reference you can check this Connect article.
2. Behind the scenes
One of the most important things you should know about building custom reports is that at runtime (when the report is rendered/executed in SSMS) there are several predefined parameters passed from Object Explorer (OE) to the report and which you can use freely. The parameters and their short explanation you can find below:

Parameter Name
CLR data type
Comments
ObjectTypeName
String
The type of object. For example, “Database”, “Login”, “Functions”.
ObjectName
String
The name of the object. For example, “Foo”, “AdventureWorksDW”, “GetUserIDFromName”, etc.
ErrorText
String
Used in the Default report to show error information.
Filtered
Boolean
This was used to indicate whether the dataset being passed from OE is filtered or not. We will respect the filters the user has in place in OE and this parameter allows us to indicate on the list reports whether the list is filtered.
ServerName
String
Name of the server and instance currently connected. In the form of “server\instance” for a named instance and “server” for a default instance.
Prompt Name: ServerName
Allow Null:    checked
Allow Blank:  checked
Avail Values: none
Defaults:       none
FontName
String
Name of the font to be used to display the report.
Defaults:       Non-Queried – “Tahoma”
DatabaseName
String
Name of the database containing the current object. If the object is not database scoped, this value will be an empty string.


As you can see those parameters are the key to create dynamic reports on lower level than SQL Server instance (like database or table).
3. How to start
First you can start with creating a BIDS Report Server project. Having that done, create a Shared datasource to the master database of your SQL instance. Name it “master.rds“.
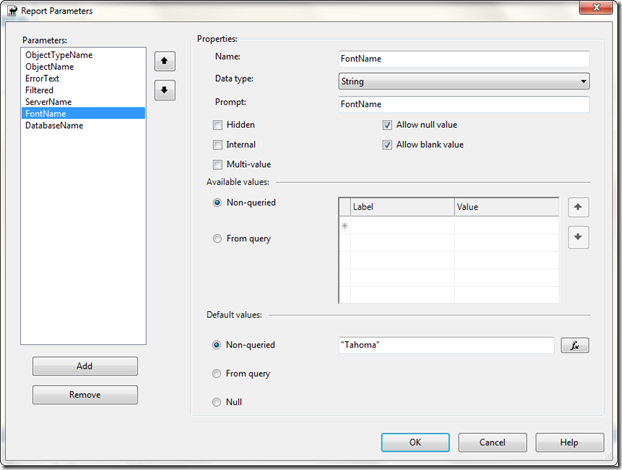
Second – create a report template, that you can use for further starting point for each report. In this template you have to only setup the parameters. Go to Report -> Parameters and insert all parameters using the info at the above table. Make sure you use the same names and caption. After you are done with that task, your parameters screen should look something like this:
clip_image001

You can also use the below XML, paste it into a text file and rename it to .rdl, add it to your BIDS solution and use it as a template.
<?xml version="1.0" encoding="utf-8"?>
<Report xmlns="http://schemas.microsoft.com/sqlserver/reporting/2005/01/reportdefinition" xmlns:rd="http://schemas.microsoft.com/SQLServer/reporting/reportdesigner">
  <InteractiveHeight>11in</InteractiveHeight>
  <ReportParameters>
    <ReportParameter Name="ObjectTypeName">
      <DataType>String</DataType>
      <Nullable>true</Nullable>
      <AllowBlank>true</AllowBlank>
      <Prompt>ObjectTypeName</Prompt>
    </ReportParameter>
    <ReportParameter Name="ObjectName">
      <DataType>String</DataType>
      <Nullable>true</Nullable>
      <AllowBlank>true</AllowBlank>
      <Prompt>ObjectName</Prompt>
    </ReportParameter>
    <ReportParameter Name="ErrorText">
      <DataType>String</DataType>
      <Nullable>true</Nullable>
      <AllowBlank>true</AllowBlank>
      <Prompt>ErrorText</Prompt>
    </ReportParameter>
    <ReportParameter Name="Filtered">
      <DataType>Boolean</DataType>
      <Nullable>true</Nullable>
      <AllowBlank>true</AllowBlank>
      <Prompt>Filtered</Prompt>
    </ReportParameter>
    <ReportParameter Name="ServerName">
      <DataType>String</DataType>
      <Nullable>true</Nullable>
      <AllowBlank>true</AllowBlank>
      <Prompt>ServerName</Prompt>
    </ReportParameter>
    <ReportParameter Name="FontName">
      <DataType>String</DataType>
      <Nullable>true</Nullable>
      <DefaultValue>
        <Values>
          <Value>"Tahoma"</Value>
        </Values>
      </DefaultValue>
      <AllowBlank>true</AllowBlank>
      <Prompt>FontName</Prompt>
    </ReportParameter>
    <ReportParameter Name="DatabaseName">
      <DataType>String</DataType>
      <Nullable>true</Nullable>
      <AllowBlank>true</AllowBlank>
      <Prompt>DatabaseName</Prompt>
    </ReportParameter>
  </ReportParameters>
  <rd:DrawGrid>true</rd:DrawGrid>
  <InteractiveWidth>8.5in</InteractiveWidth>
  <rd:GridSpacing>0.25cm</rd:GridSpacing>
  <rd:SnapToGrid>true</rd:SnapToGrid>
  <RightMargin>2.5cm</RightMargin>
  <LeftMargin>2.5cm</LeftMargin>
  <BottomMargin>2.5cm</BottomMargin>
  <rd:ReportID>ddeb9983-9825-4554-9cc9-545bb2680e52</rd:ReportID>
  <PageWidth>21cm</PageWidth>
  <Width>4.75cm</Width>
  <Body>
    <ColumnSpacing>1cm</ColumnSpacing>
    <ReportItems>
      <Textbox Name="textbox1">
        <rd:DefaultName>textbox1</rd:DefaultName>
        <Style>
          <Color>SteelBlue</Color>
          <FontFamily>Tahoma</FontFamily>
          <FontSize>20pt</FontSize>
          <FontWeight>700</FontWeight>
          <PaddingLeft>2pt</PaddingLeft>
          <PaddingRight>2pt</PaddingRight>
          <PaddingTop>2pt</PaddingTop>
          <PaddingBottom>2pt</PaddingBottom>
        </Style>
        <CanGrow>true</CanGrow>
        <Height>0.91429cm</Height>
        <Value>00 Template</Value>
      </Textbox>
    </ReportItems>
    <Height>3.15476cm</Height>
  </Body>
  <Language>en-US</Language>
  <TopMargin>2.5cm</TopMargin>
  <PageHeight>29.7cm</PageHeight>
</Report>

4. Standard SSMS report sources
Finally – from this link you can download all reports that are currently available in Management Studio. Some of those reports can run outside SSMS but some of them cannot due to different reasons. However, inside those reports there are quite valuable queries that you can use in your day-to-day tasks or add them to your script bank.

Tuesday, June 26, 2012

Get Service Account Name

To get service account name use below query:


DECLARE @MSSqlService VARCHAR(50)
EXECUTE master.dbo.xp_instance_regread
 N'HKEY_LOCAL_MACHINE'
,N'SYSTEM\CurrentControlSet\Services\MSSQLSERVER'
,N'ObjectName'
,@MSSqlService OUTPUT
,N'no_output'
SELECT @MSSqlService AS SQL_Service_Account


Monday, June 25, 2012

Could not connect to the report server.


Today when I was trying to deploy a Report project using SQL Server 2008 BIDS (Business Intelligence Development Studio), I receieved the following error:

Microsoft Report Designer
Could not connect to the report server http://computername:8080/ReportServer. Verify that the TargetServerURL is valid and that you have the correct permissions to connect to the report server.
Additional information:
The operation has timed out (System.Web.Services)


And the deployment of the project failed. 


I examined the rsreportserver.config located on the \Program Files\Microsoft SQL Server\MSRS10.MSSQLSERVER\Reporting Services\ReportServer directory and found SSL was configure on the report server.

I edited the rsreportserver.config file, and changed the key <Add Key="SecureConnectionLevel" Value="2"/> to <Add Key="SecureConnectionLevel" Value="0"/>.

Then I was able to deploy the report project succesfully.

------ Build started: Project: MorilloBasicTableReport, Configuration: Debug ------
Build complete -- 0 errors, 0 warnings
------ Deploy started: Project: MorilloBasicTableReport, Configuration: Debug ------
Deploying to http://computername:8080/ReportServer
Deploying report '/MorilloBasicTableReport/Sales by Area'.
Deploying report '/MorilloBasicTableReport/Sales Orders'.
Deploy complete -- 0 errors, 0 warnings
========== Build: 1 succeeded or up-to-date, 0 failed, 0 skipped ==========
========== Deploy: 1 succeeded, 0 failed, 0 skipped ==========
Ref: http://www.sqlcoffee.com/Troubleshooting096.htm

Saturday, June 23, 2012

Removing unwanted spaces within a string

Removing leading and trailling spaces is pretty easy. All you need to do is make use of Ltrim and Rtrim function respectively. But there are times when you want to remove unwanted spaces within a string. Check out the below code to know how to do it. 


/*Declaration and Initialization */
Declare @strValue varchar(50)
Set @strValue = ' I     Love     you ! ' 


/*Remove the leading and trailing spaces*/
Set @strValue = Rtrim(Ltrim(@strValue))


/*Loop through and remove more than one spaces to single space. */
While CharIndex('  ',@strValue)>0
Select @strValue = Replace(@strValue, '  ', ' ')


/*Final output*/
Select @strValue

Friday, June 22, 2012

Enable SQL Server Authentication and Windows Authentication for SQL Server Databases

Follow below procedure to enable both SQL Server Authentication and Windows Authentication in SQL Server 2008 database, and then add a User login and password account for connecting to the database.
  • Open SQL Server Management Studio.
  • In the Object Explorer sidebar, right-click on the top SQL Server node, then click Properties.
  • In the Server Properties pop-up box, click on Security, then in the Server authentication section select "SQL Server and Windows Authentication mode" and click OK.
  • Now in the Object Explorer, open the Security folder node, then right-click on the Logins folder, and select New Login.
  • In the New - Login popup, enter in the Login name you want to create, then select SQL Server authentication.  Type in Password and Confirm Password  (Note: the password should have letters and numbers).  Then uncheck Enforce password expiration and uncheck User must change password at next login.  Then change the Default database drop-down box to the database you want to use.
  • Then on the left-hand side click User Mapping.  In the Users mapped to this login: section check the Map checkbox next to the database you want the user mapped to.  Then in the Database role membership section, check db_owner. ("dbo" should be added to the Default Scheme automatically for the user login once saved).  Click OK to save changes. 
  • The new User/login should be added to the database.  To check to make sure, go the Object Explorer, locate the database and click on the plus sign to open up the node, then open the Security folder node, and open the Users folder, you should see the User you just created is in the list of Users for the database.
  • Now we need to assign the user to the "db_owner" scheme and role membership. Right-click on the User name, then in the Database User popup box you will want to make sure that "db_owner" is checked in both Schemes owned by this user and Database role membership.  The click OK.
Now you can use both SQL Server and Windows Authentication connection string to connect to your database like this:


connectionString="data source=.; Initial Catalog=DemoData; Integrated Security=True;" 
Or use a SQL Server Authentication connection string like this:


connectionString="data source=.;Initial Catalog= DemoData ;User Id=myUsername;Password=myPassword;"

Thursday, June 21, 2012

Enable Object Explorer in SQL server 2008 R2

Today after installing Microsoft SQL server 2008 R2 on one of developers system, Object Explorer was not getting opened.


To resolve this issue following steps are used and Object explorer got visible


Window —> Reset Window Layout in Management Studio.

Wednesday, June 20, 2012

How to Add a Linked Server

Adding a Linked server can be done by either using the GUI interface or the sp_addlinkedserver command.
Adding a linked Server using the GUI
There are two ways to add another SQL Server as a linked server.  Using the first method, you need to specify the actual server name as the “linked server name”.  What this means is that everytime you want to reference the linked server in code, you will use the remote server’s name.  This may not be beneficial because if the linked server’s name changes, then you will have to also change all the code that references the linked server.  I like to avoid this method even though it is easier to initially setup.  The rest of the steps will guide you through setting up a linked server with a custom name:
To add a linked server using SSMS (SQL Server Management Studio), open the server you want to create a link from in object explorer.
  1. In SSMS, Expand Server Objects -> Linked Servers -> (Right click on the Linked Server Folder and select “New Linked Server”)
  2. Add New Linked Server
    Add New Linked Server
  3. The “New Linked Server” Dialog appears.  (see below).
  4. Linked Server Settings
    Linked Server Settings
  5. For “Server Type” make sure “Other Data Source” is selected.  (The SQL Server option will force you to specify the literal SQL Server Name)
  6. Type in a friendly name that describes your linked server (without spaces). I use AccountingServer.
  7. Provider – Select “Microsoft OLE DB Provider for SQL Server”
  8. Product Name – type: SQLSERVER (with no spaces)
  9. Datasource – type the actual server name, and instance name using this convention: SERVERNAME\INSTANCENAME
  10. ProviderString – Blank
  11. Catalog – Optional (If entered use the default database you will be using)
  12. Prior to exiting, continue to the next section (defining security)
Define the Linked Server Security
Linked server security can be defined a few different ways. The different security methods are outlined below.  The first three options are the most common:
Option NameDescription
Be made using the login’s current security contextMost Secure. Uses integrated authentication, specifically Kerberos delegation to pass the credentials of the current login executing the request to the linked server. The remote server must also have the login defined. This requires establishing Kerberos Constrained Delegation in Active Directory, unless the linked server is another instance on the same Server.  If instance is on the same server and the logins have the appropriate permissions, I recommend this one.
Be made using this security contextLess Secure. Uses SQL Server Authentication to log in to the linked server. The credentials are used every time a call is made.
Local server login to remote server login mappingsYou can specify multiple SQL Server logins to use based upon the context of the user that is making the call.  So if you have George executing a select statement, you can have him execute as a different user’s login when linking to the linked server.  This will allow you to not need to define “George” on the linked server.
Not be madeIf a mapping is not defined, and/or the local login does not have a mapping, do not connect to the linked server.
Be made without using a security contextConnect to the server without any credentials.  I do not see a use for this unless you have security defined as public.
  1. Within the same Dialog on the left menu under “Select a Page”, select Security
  2. Enter the security option of your choice.
  3. Linked Server Security Settings
    Linked Server Security Settings
  4. Click OK, and the new linked server is created