Search

Thursday, February 24, 2011

How many databases can be mirrored on a single instance of Microsoft SQL Server?

We can configure 10 databases for 32-bit operating system.On a 32-bit system, database mirroring can support a maximum of about 10 databases per server instance because of the numbers of worker threads that are consumed by each database mirroring session.

For 64-Bit Operating system we can mirror more than 10 databases depending on the number of processors and worker threads. Many company has deployed more that 10 Databases as mirrored.

Wednesday, February 23, 2011

Join Operations - Nested Loops

Microsoft has provided three join operations for use in SQL Server. These operations are Nested Loops, Hash Match and Merge Join. Each of these provides different benefits and depending on the workload can be a better choice than the other two for a given query. The optimizer will choose the most efficient of these based on the conditions of the query and the underlying schema and indexes involved in the query. This article is the first of three in a series to explore these three Join Operations.

Nested Loops

The Nested Loops operation is sometimes referred to as the Nested Iteration. This is a join condition where there is an inner table that is looped through to meet the query criteria and compare it to each row of the outer table. A Nested Loop may be used for any of the following logical operations: inner join, left outer join, left semi-join, left anti-semi-join, cross apply, outer apply and cross join. It supports all join predicates.


In a Graphical Execution Plan, the Nested Loops Operator looks like the following image.


When using the "set statistics profile" option, you will notice that the Nested Loops will appear in your results as shown in the following image.

In Action


How can we see the Nested Loops join in action? Let's do a little setup to demonstrate the Nested Loops join. First let's create a couple of tables and then populate those tables with the following scripts.

SELECT TOP 10000

OrderID
= IDENTITY(INT,1,1),
OrderAmt
= CAST(ABS(CHECKSUM(NEWID()))%10000 /100.0 AS MONEY),
OrderDate
= CAST(RAND(CHECKSUM(NEWID()))*3653.0+36524.0 AS DATETIME)
INTO dbo.Orders
FROM Master.dbo.SysColumns t1,
Master
.dbo.SysColumns t2
go

CREATE TABLE [dbo].[OrderDetail](
[OrderID] [int] NOT NULL,
[OrderDetailID] [int] NOT NULL,
[PartAmt] [money] NULL,
[PartID] [int] NULL)

;
Insert Into OrderDetail (OrderID,OrderDetailID,PartAmt,PartID)
Select OrderID,
OrderDetailID
= 1,
PartAmt
= OrderAmt / 2,
PartID
= ABS(CHECKSUM(NEWID()))%1000+1
FROM Orders

As you can see, I have created two tables for this simple example. Neither table has an Index or a Primary Key at this point. Let's run a query against these tables and see the results.

Select O.OrderId, OD.OrderDetailID, O.OrderAmt, OD.PartAmt, OD.PartID, O.OrderDate

From Orders O
Inner Join OrderDetail OD
On O.OrderID = OD.OrderID

Here, we see that the query results in a Hash Match at this point. I could force a Nested Loops if I were to use a query option such as shown in the following query.

Select O.OrderId, OD.OrderDetailID, O.OrderAmt, OD.PartAmt, OD.PartID, O.OrderDate

From Orders O
Inner Join OrderDetail OD
On O.OrderID = OD.OrderID
-- This is a hash match for this example
Option (loop join) --force a loop join

This will provide us with a Nested Loops Join by forcing the optimizer to use one. However, this is not recommended unless you know for certain that the Nested Loops Join is better in this case. The optimizer takes into account the number of records as well as the indexes involved in the query.

Let's take it a step further now. I will put some Primary Keys (with Clustered Indexes on the Primary Keys) on the tables and then I will run the same query again and check the results again.

ALTER TABLE dbo.Orders

ADD PRIMARY KEY CLUSTERED (OrderID)
ALTER TABLE dbo.OrderDetail
ADD PRIMARY KEY CLUSTERED (OrderID,OrderDetailID)

As can be seen we now have a Merge Join. This Merge Join is happening due to the large number of records in both tables (relatively). The optimizer has chosen this operation as the fastest method to achieve the results. Notice that the execution plan now performs CI scans on both tables. Previously, we saw that the optimizer had performed table scans on both tables. (Note: A CI scan is essentially a table scan. The use of a Clustered Index scan here is merely to denote the subtle difference in the graphical execution plan.) We also see that relative cost has shifted somewhat from the Join Operator to the Index Scans.

I will now take this one step further. I will now change the query ever so slightly and you will see that we will get a Nested Loops Operator in place of the Merge Join.

Select O.OrderId, OD.OrderDetailID, O.OrderAmt, OD.PartAmt, OD.PartID, O.OrderDate

From Orders O
Inner Join OrderDetail OD
On O.OrderID = OD.OrderID
Where O.OrderID < 10

The change employed is to reduce the result set from one of the tables. In this case, I chose to return all records from both tables where Orders.OrderID was less than 10. With indexes being placed on the Join columns and the Orders. Orderid having a condition on it, we now reduce the number of operations and we also reduce the IO required to perform this query. This correlates with the following statement from MSDN:

If one join input is small (fewer than 10 rows) and the other join input is fairly large and indexed on its join columns, an index nested loops join is the fastest join operation because they require the least I/O and the fewest comparisons. http://msdn.microsoft.com/en-us/library/ms191426.aspx

Let's evaluate that from another perspective. Let's take a look at the IO statistics and execution time for the Merge Join and Hash Match in comparison to the Nested Loops, as shown to this point with the progression of the queries. (This may not be a fair comparison at the moment. I intend this more of a demonstration for this example as the query became more optimized.) As a reminder, this applies specifically to only this particular example.

Table 1
Merge JoinHash MatchNested Loops
OrderDetail Physical Reads000
OrderDetail Logical Reads383718
Orders Physical Reads000
Orders Logical Reads38372
Elapsed Time604 ms775 ms261 ms

From this we see that the logical reads on both tables and the Elapsed Time decrease substantially. In this case, we have fewer records and are using the indexes to query for the result set. Referring back to the Execution Plan, one sees that we are using Clustered Index seeks. In this example that I am using to this point, I only have a 1 to 1 relationship in the table, though I could have a 1 to many. I need to add a few more records to create a result set indicative of a one-to-many relationship. This is done through the following script.

Insert into OrderDetail (OrderID,OrderDetailID,PartAmt,PartID)

Select OrderID,
OrderDetailID
= 2,
PartAmt
= OrderAmt / 2,
PartID
= ABS(CHECKSUM(NEWID()))%1000+1
FROM Orders

Now I will re-run those stat comparisons. For brevity I will just compare the Merge Join and the Nested Loops Join.

Table 2
Merge JoinNested Loops
OrderDetail Physical Reads00
OrderDetail Logical Reads7418
Orders Physical Reads00
Orders Logical Reads382
Elapsed Time851 ms1 ms

This further demonstrates how the Nested Loops is a better fit in this particular query. Due to the indexes and the where condition, the query optimizer can use a Nested Loops and the performance will be better. But what if I use a query hint and force the Merge Join query to become a nested loops join, how will that affect the outcome?

Table 3
Merge Join forced to Loops join via query hintNested Loops
OrderDetail Physical Reads00
OrderDetail Logical Reads2137418
Orders Physical Reads00
Orders Logical Reads382
Elapsed Time473 ms1 ms

By trying to force the optimizer to use a Nested Loops where the query didn't really warrant it, we did not improve the query and it could be argued that we caused more work to be performed.

Conclusion

The Nested Loops join is a physical operator that the optimizer employs based on query conditions. The Nested Loops can be seen in a graphical execution plan and can be employed when one of these logical joins is used: inner join, left outer join, left semi join, and left anti semi join. The Nested Loops Join is also more likely to be the choice of the optimizer when one table has fewer records (e.g. <=10) and there are good indexes on the join columns in the query.


Ref: http://www.sqlservercentral.com

Tuesday, February 22, 2011

Recover Master File from SQL Server database by SQL Recovery Software

Structured query language (SQL) is a database computer language designed for managing data in RDBMs developed by Microsoft corporation. It has two primary query languages, ANSISQL and T-SQL. It offers the facility to access SQL Server database from anywhere, be it from your desktop or data center. It also provides combined services to search, query, report synchronize and analyze the database records. Sometimes it may happen that the SQL Server is unable to run. It may possible that the master database of SQL Server has gone damaged. This can be possible because of several reasons such as human errors, virus infections, power outages while SQL Server was open. In that case, you should replace the damaged database with its clean and backup. However, if the backup is not clean and updated then you should use an advanced sql recovery software to recover SQL database. Consider a case wherein you have Microsot SQL Server installed on your machine. When you try to log on to the SQL Server, you are unable to do and an error message is appered, that is: "Cannot recover the master database. SQL Server is unable to run. Restore master from a full backup, repair it, or rebuild it. For more information about how to rebuild the master database, see SQL Server Books Online." Cause:

The possible cause for the above mentioned error message is that the SQL Server database is unable to start the master database. If the tempdb or master database can not be mounted, SQL Server can not run. It is possible that the master database of SQL Server has gone damaged because of various above mentioned reasons. Resolution:

To solve the above issue, you should first of all, check there is a clean and updated backup of the master database. If yes, then you should replace updated backup with the damaged master database. However, if the database is not clean and updated then you should use a SQL repair tool to perform sql recovery of the damaged master database.

Monday, February 21, 2011

Rectifying Error 8906 and repairing corrupt database in SQL Server

An IAM (Index Allocation Map) page consists of eight page Ids, collectively called mixed page array, and holds the pages that are allocated to the index. The IAM pages are used to optimize the tables by allocating and deallocating storage space. Sometimes the IAM page is not able to perform as expected. Such corruption instances can occur because of various reasons such as hardware malfunctions, virus infections, power outages, abruptly exiting SQL Server, etc. To resolve such situations, you should use appropriate corrective measures. In case, you are not able to recover SQL database then you should use a third-party SQL database recovery software to do so.

Consider a scenario wherein you encounter the following error message while working on an SQL Server 2000 database:

Page P_ID in database ID DB_ID is allocated in the SGAM SGAM_P_ID and PFS PFS_P_ID, but was not allocated in any IAM. PFS flags 'PFS_FLAGS'.”

Cause:

The root cause of this error is that a page that is not reflecting as an IAM page and also not seen in the mixed page array of IAM page. This is quite contradictory as this page has mixed page bit set in its PFS byte.

Resolution:

There could be the following resolutions that you can perform to resolve this error:

  • Look for hardware problems: You should run hardware diagnostics and check for problems, if any. You can also check the error log report to ascertain whether this error has occurred because of any hardware malfunctions. In addition, you should swap the hardware components to zero down on the cause of error. In the end, you can also consider reformatting the hard disks and reinstalling the operating system to get a fresh operating system.

  • Restore from backup: After confirming that this is not a hardware related error, you should check the backup of the database. If it is updated and clean, then you should restore the database from the backup.

  • Run DBCC CHECKDB: If none of the previous methods work, then you should run the DBCC CHECKDB command without any repair clause to know the level of corruption. Then, you should run it again with the recommendedrepair clause.

The aforementioned methods should repair the corrupted database. However, if you still encounter the same error again then you should use a third-party SQL database recovery software to do the needful. Such read-only tools performSQL recovery without overwriting the existing database.

Saturday, February 19, 2011

Different strategies for removing duplicate records in SQL Server

Problem
In data warehousing applications during ETL (Extraction, Transformation and Loading) or even in OLTP (On Line Transaction Processing) applications we are often encountered with duplicate records in our table. To make the table data consistent and accurate we need to get rid of these duplicate records keeping only one of them in the table. In this tip I discuss different strategies which you can take for this, along with the pros and cons.

Solution
There are different methods for deleting duplicate (de-duplication) records from a table, each of them has its own pros and cons. I am going to discuss these methods, prerequisite of each of these methods along with its pros and cons.

  1. Using correlated subquery
  2. Using temporary table
  3. Creating new table with distinct records and renaming it..
  4. Using Common Table Expression (CTE)
  5. Using Fuzzy Group Transformation in SSIS
  6. Using MERGE Statement

1. Using correlated subquery

If you already have a identity column on your table, your work is half done. You can use a correlated subquery to get rid of the duplicates.

First let me briefly tell you how a correlated subquery works. In a correlated subquery, first outer query is evaluated, the result from the outer query is used by an inner sub query for its evaluation, whatever the outcome of the inner sub-query is again used by the outer query to get the final resultset. To learn more about correlated subqueries, you can click here.

In the example below, for the data deletion I am joining the inner query columns with the outer query to find the record with the maximum ID (you can even use minimum also and change the predicate to ">" from "<"). Then I am deleting all the records which has an ID less than what we have got from the inner query.

Please note, this approach can be taken only if you have identity column on the target table or you are willing to alter your target table to add an identity column which would require ALTER TABLE permission.

Script #1 - De-duplication with correlated subquery

CREATE TABLE Employee
(

[ID]
INT IDENTITY,
[FirstName]
Varchar(100),
[LastName]
Varchar(100),
[Address]
Varchar(100),
)

GO
INSERT
INTO Employee([FirstName], [LastName], [Address])
VALUES
('Linda', 'Mitchel', 'America')
INSERT
INTO Employee([FirstName], [LastName], [Address])
VALUES
('Linda', 'Mitchel', 'America')
INSERT
INTO Employee([FirstName], [LastName], [Address])
VALUES
('John', 'Albert', 'Australia')
INSERT
INTO Employee([FirstName], [LastName], [Address])
VALUES
('John', 'Albert', 'Australia')
INSERT
INTO Employee([FirstName], [LastName], [Address])
VALUES
('John', 'Albert', 'Australia')
INSERT
INTO Employee([FirstName], [LastName], [Address])
VALUES
('Arshad', 'Ali', 'India')
INSERT
INTO Employee([FirstName], [LastName], [Address])
VALUES
('Arshad', 'Ali', 'India')
INSERT
INTO Employee([FirstName], [LastName], [Address])
VALUES
('Arshad', 'Ali', 'India')
INSERT
INTO Employee([FirstName], [LastName], [Address])
VALUES
('Arshad', 'Ali', 'India')
GO
SELECT
* FROM Employee
GO

--Selecting distinct records

SELECT
* FROM Employee E1
WHERE
E1.ID = ( SELECT MAX(ID) FROM Employee E2
WHERE E2.FirstName = E1.FirstName AND E1.LastName = E2.LastName
AND E1.Address = E2.Address)
GO

--Deleting duplicates

DELETE
Employee
WHERE
ID < ( SELECT MAX(ID) FROM Employee E2
WHERE E2.FirstName = Employee.FirstName AND E2.LastName =Employee.LastName
AND E2.Address = Employee.Address)
GO
SELECT
* FROM Employee
GO


2. Using temporary table

In this approach we pull distinct records from the target table into a temporary table, then truncate the target table and finally insert the records from the temporary table back to the target table as you can see in Script #3.

Three things you need to be aware of when you are using this approach.

  • First you need to make sure you have or set enough size for tempdb database to hold all the distinct records especially if it is very large result-set.

  • Second you need to make sure you perform this operation in a transaction, at least the TRUNCATE and INSERT parts so that you are not left with an another problem if it fails in between for any reason.

  • Third you need to have the required permissions for object creation/truncation.

Script #2, creates a table and inserts some records along with some duplicate records which we will be using in all further examples.

Script #2 - Creating a table with duplicate records

CREATE TABLE Employee
(

[FirstName]
Varchar(100),
[LastName]
Varchar(100),
[Address]
Varchar(100),
)

GO
INSERT
INTO Employee([FirstName], [LastName], [Address])
VALUES
('Linda', 'Mitchel', 'America')
INSERT
INTO Employee([FirstName], [LastName], [Address])
VALUES
('Linda', 'Mitchel', 'America')
INSERT
INTO Employee([FirstName], [LastName], [Address])
VALUES
('John', 'Albert', 'Australia')
INSERT
INTO Employee([FirstName], [LastName], [Address])
VALUES
('John', 'Albert', 'Australia')
INSERT
INTO Employee([FirstName], [LastName], [Address])
VALUES
('John', 'Albert', 'Australia')
INSERT
INTO Employee([FirstName], [LastName], [Address])
VALUES
('Arshad', 'Ali', 'India')
INSERT
INTO Employee([FirstName], [LastName], [Address])
VALUES
('Arshad', 'Ali', 'India')
INSERT
INTO Employee([FirstName], [LastName], [Address])
VALUES
('Arshad', 'Ali', 'India')
INSERT
INTO Employee([FirstName], [LastName], [Address])
VALUES
('Arshad', 'Ali', 'India')
GO
SELECT
* FROM Employee
GO

Script #3 - Using temporary table

BEGIN TRAN
-- Pull distinct records in the temporary table
SELECT DISTINCT * INTO #Employee
FROM Employee
--Truncate the target table
TRUNCATE TABLE Employee
--Insert the distinct records from temporary table
--back to target table
INSERT INTO Employee SELECT * FROM #Employee
--Drop the temporary table
IF OBJECT_ID('tempdb..#Employee') IS NOT NULL
DROP TABLE #Employee
COMMIT
TRAN
GO
SELECT
* FROM Employee
GO

3. Creating new table with distinct records and renaming it

In this approach we create a new table with all distinct records, drop the existing target table and rename the newly created table with the original target table name. Please note, with this approach the meta-data about the target table will change for example object id, object creation date etc. so if you have any dependencies on these you have to take them into consideration.

Three things you need to aware of when you are using this approach.

  • First you need to make sure you have enough space in your database in the default filgroup (if you want your new table to be on some other file group than the default filegroup then you need to create a table first and then use INSERT INTO....SELECT * FROM) to hold all the distinct records especially if it is very large result-set.

  • Second you need to make sure you perform this operation in a transaction, at least the DROP and RENAME part so that you are not left with an another problem if it fails in between for any reason.

  • Third you need to have required permissions for object creation/drop.

Script #4 - New table with distinct only

BEGIN TRAN
-- Pull distinct records in a new table
SELECT DISTINCT * INTO EmployeeNew
FROM Employee
--Drop the old target table
DROP TABLE Employee
--rename the new table
EXEC sp_rename 'EmployeeNew', 'Employee'
COMMIT
TRAN
GO
SELECT
* FROM Employee
GO

4. Using Common Table Expression (CTE)

SQL Server 2005 introduced Common Table Expression (CTE) which acts as a temporary result set that is defined within the execution scope of a single SELECT, INSERT, UPDATE, DELETE, or CREATE VIEW statement.

In this example I am using a CTE for de-duplication. I am using the ROW_NUMBER function to return the sequential number of each row within a partition of a result set which is a grouping based on [FirstName], [LastName], [Address] columns (or columns of the table) and then I am deleting all records except where the sequential number is 1. This means keeping one record from the group and deleting all other similar/duplicate records. This is one of the efficient methods to delete records and I would suggest using this if you have SQL Server 2005 or 2008.

Script #5 - Using CTE for de-duplication

--example 1
WITH
CTE AS
(

SELECT ROW_NUMBER() OVER
(PARTITION BY [FirstName], [LastName], [Address]
Order BY [FirstName] DESC, [LastName] DESC, [Address] DESC )
AS RowNumber
FROM Employee tbl
WHERE EXISTS (SELECT TOP 1 1 FROM (SELECT FirstName,LastName,Address
FROM Employee
GROUP BY [FirstName], [LastName], [Address] HAVING COUNT(*) > 1 )GrpTable
WHERE GrpTable.FirstName = tbl.FirstName AND
GrpTable
.LastName = tbl.LastName AND GrpTable.Address = tbl.Address)
)

DELETE
FROM CTE Where RowNumber > 1
GO
SELECT
* FROM Employee
GO

--A more simplified and faster example
WITH CTE AS
(

SELECT ROW_NUMBER() OVER
(PARTITION BY [FirstName], [LastName], [Address]
Order BY [FirstName] DESC, [LastName] DESC, [Address] DESC )
AS RowNumber,
[FirstName]
, [LastName], [Address]
FROM Employee tbl )
DELETE
FROM CTE Where RowNumber > 1
GO
SELECT
* FROM Employee
GO


5. Using Fuzzy Group Transformation in SSIS

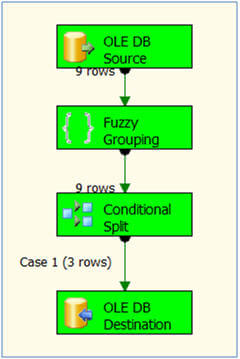
If you are using SSIS to upload data to your target table, you can use a Fuzzy Grouping Transformation before inserting records to the destination table to ignore duplicate records and insert only unique records. Here, in the image below, you can see 9 records are coming from source, but only 3 records are being inserted into the target table, that's because only 3 records are unique out of the 9 records. Refer to Script #2 above to see more about these 9 records that were used.
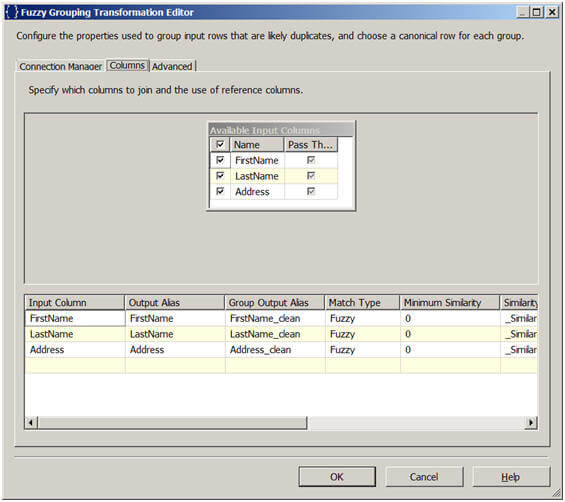
In the Fuzzy Grouping Transformation editor, on the Columns tab you specify the columns which you want to be included in grouping. As you can see in the below image I have chosen all 3 columns in my consideration for grouping.
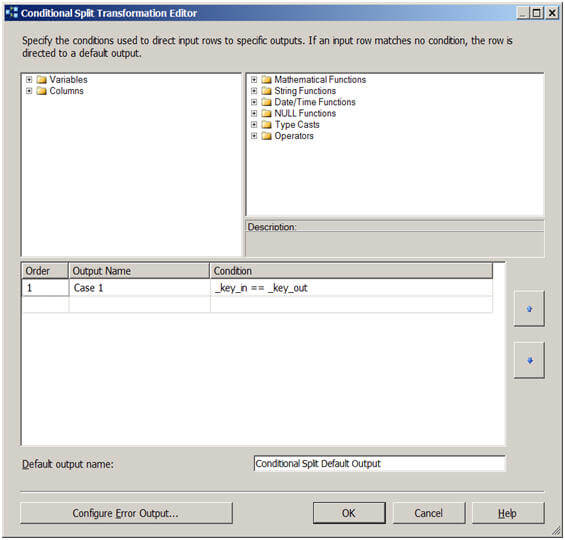
In the Fuzzy Grouping Transformation, you might add a conditional split to direct unique rows or duplicate rows to two destinations. Here in the example you can see I am routing all the unique rows to the destination table and ignoring the duplicate records. The Fuzzy Grouping Transformation produces a few additional columns like_key_in which uniquely identifies each rows, _key_out which identifies a group of duplicate records etc.

6. Using MERGE Statement

Beginning with SQL Server 2008, now you can use MERGE SQL command to perform INSERT/UPDATE/DELETE operations in a single statement. This new command is similar to the UPSERT (fusion of the words UPDATE and INSERT.) command of Oracle. It inserts rows that don’t exist and updates the rows that do exist. With the introduction of the MERGE SQL command, developers can more effectively handle common data warehousing scenarios, like checking whether a row exists and then executing an insert or update or delete.

The MERGE statement basically merges data from a source result set to a target table based on a condition that you specify and if the data from the source already exists in the target or not. The new SQL command combines the sequence of conditional INSERT, UPDATE and DELETE commands in a single atomic statement, depending on the existence of a record. With this you can make sure no duplicate records are being inserted into the target table, but rather updated if there is any change and only new records are inserted which do not already exist in the target. For more information about this you can click here.

Ref: http://www.mssqltips.com/tip.asp?tip=1918